Exports are specified using the Exports properties box in the module from which records are to be exported:
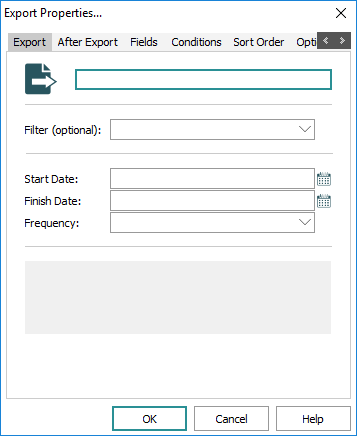
In the module from which the records are to be exported:
- Search for the records that you want to include in the export.
Note: In this example, our export will be called Objects worth more than $5000 and our search should locate object records where the valuation amount is greater than $5000.
- Select Export on the Tools tab of the Ribbon.
The Exports box displays with a list of any Scheduled Exports already defined for the current module.
- Click New to display the Export Properties box (see image above).
- Enter a descriptive name for the Export Schedule in the top text field.
The title will display in the Exports box, from where it can be selected by authorized users to run the export on an ad-hoc basis.
- By default, data is exported as XML. If you require data to be transformed to another format (e.g. CSV), select a filter from the Filter (optional) drop list.
 Filters
System Administrators can define filters to produce other output formats and to:
- Email export files to users.
- Print export files.
- Copy export files to a known location (for collection).
- Transmit export files to another machine.
See How to create filters for details.
- Enter the first date on which the export will be produced in the Start Date field.
This date is also used to calculate the next time an export should occur when the report frequency is specified as a number of days / months / years.
The format of the date (e.g. dd/mmm/yyyy) is as specified for your EMu system.
A start date must be provided.
- Enter an end date in the Finish Date field.
An end date is not required. If provided, data will not be exported after that date has been reached.
An empty end date implies no final date for exporting data.
- Select an export frequency from the Frequency drop list.
There are four frequency values to choose from:
Frequency Description Ad hoc
Select if defining an export that will not be run at a regular interval. As the export is not scheduled, it must be run manually to produce the export data. See How to run an Unscheduled Export for details.
Daily
Select if the data is exported on anything less than a monthly basis. When selected, the following options are available:
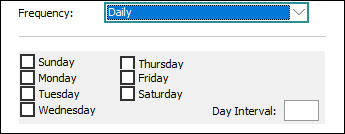
There are three ways to configure daily exports:
1.
Select (click and tick) the days of the week on which the export is to occur.
The export will run early in the morning of the day(s) selected until the Finish Date is reached or indefinitely if no Finish Date is specified.
-OR- 2.
Specify the number of days between exports (starting from the Start Date) in the Day Interval field.
For example, a value of 14 indicates that the export is to be run fortnightly from the Start Date.
-OR- 3.
Specify the day on which an export will first be run and the interval between exports.
For example, a value of 14 for Day Interval, with Thursday selected indicates that an export will commence on the first Thursday after or on the Start Date and will run every 14 days.
Monthly
Select for data export on a monthly basis but less often than annually. When selected, the following options are available:
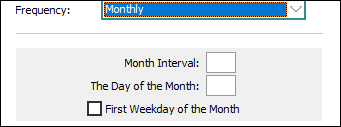
Specify the number of months between each report using the Month Interval field. If a value is not given, the export will occur monthly. For example, a value of 3 indicates that the export will occur quarterly.
In The Day of the Month field specify on what day in the month the export is to occur. A value of 1 indicates that the export will run on the first day of the month. A value of 31 implies the last day of the month, regardless of how many days are in the month.
The First Weekday of the Month checkbox may be selected instead of specifying a day of the month. In this case, the export is run early in the morning on the first weekday (Monday to Friday) of the month.
A value must be supplied for either Month Interval or the First Weekday of the Month.
Annually
Select for any data export required on a yearly basis. When selected, the following options are available:
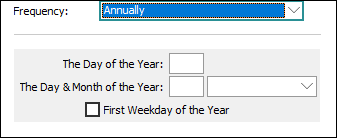
There are three ways to configure annual exports:
1.
Specify the day of the year on which the export is to take place in The Day of the Year field. A value between 1 and 365 can be used. -OR- 2.
Specify a specific day in a given month using the Day & Month of the Year fields.
If a date of 1 July is specified in The Day & Month of the Year fields for example, the export will include data available in the system up to and including 30 June.
-OR- 3.
The First Weekday of the Year checkbox may be selected instead of specifying a day within a month. In this case, the export is executed early in the morning of the first weekday (Monday to Friday) of the Year.
Details for how to develop an After Export script can be found here.
It is possible to have a command execute automatically following an export with the After Export facility. A command could be to:
- Email the export files to a list of users.
- Email the results of the export to a list of users.
- Copy the export files to another machine behind a secure firewall.
- Copy the export files over the internet via a secure transfer mechanism.
- Send an SMS to one or more telephone numbers.
In fact, an After Export command may perform any number of tasks as it has full access to the Exports record generated. The command runs on the EMu server allowing access to the full facilities offered by the server. The After Export facility is designed to allow new commands to be added within the existing framework. In order to simplify the creation of new commands, the KE::Export perl module is provided; this incorporates much of the functionality required by an After Export command.
To have a command execute after an export:
- Select the After Export tab.
- Select a command from the Command drop list.
If the command needs values to be provided by a user, one or more input boxes will display below the Command drop list:
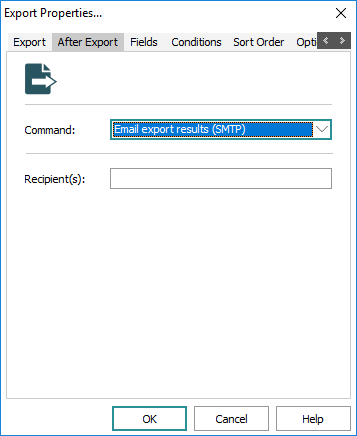
- Enter any required values.
Note: If required values are not provided, an error message will display when OK is clicked.
Next we select which fields will be exported:
- Select the Fields tab.
Here we add the fields to be exported.
- Click Add to display the Export Fields box.
The Export Fields box lists all fields in the current module, as well as fields in attached modules (an attachment field is indicated by the plus
 icon):
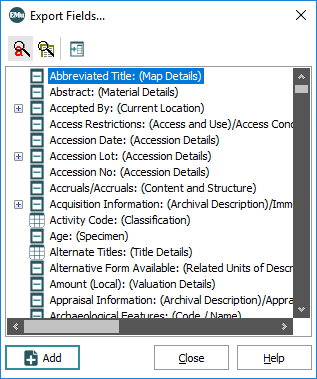
- To add a field to be exported, select it in the Export Fields box and click Add
-OR-
Double-click the field.
The field is added to the Fields tab in the Export Properties box.
- When all required fields have been added, Close the Export Fields box.
The Export Properties box now lists all the fields that will be included in the export:
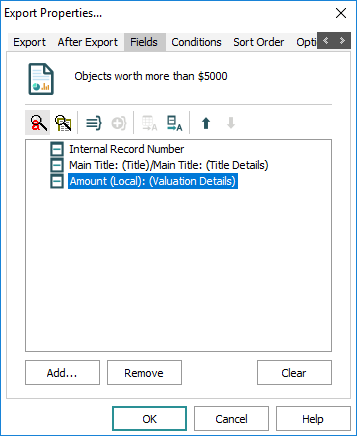
For more details regarding the selection of fields for export see Select the fields to include in the report: the Fields tab in the Reports section of the EMu help.
So far we have specified a start date for the export and a frequency, and selected which fields will be exported. What we haven't done is tell EMu which records to export those fields from. To achieve this we need to specify search criteria and we do this with a TexQL statement on the Conditions tab.
Tip: See Specifying the TexQL Conditions statement below for assistance with preparing a TexQL statement.
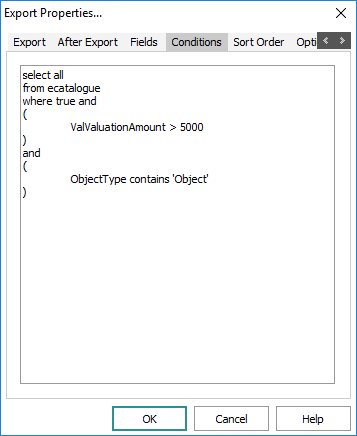
In this example our export is called Objects worth more than $5000 and our TexQL statement needs to locate object records where the valuation amount is greater than $5000.
- Select the Conditions tab.
- Enter a TexQL statement into the Conditions text box.
When the Export Properties box is closed, the TexQL statement is checked to ensure that a valid query has been specified:
 Specifying the TexQL Conditions statement
Note: A user must have (or be member of a group that has) the daEditQuery permission in order to use the Show Search facility described below.
A TexQL condition statement is a query used to retrieve the records to be exported. If you are unfamiliar with SQL, the format of the statement may be hard to piece together; fortunately there is a relatively simple way to generate a statement from search terms entered in module fields:
- In the module from which the records are to be exported, enter search terms as though you were retrieving the records you would like to export.
Note: Note that there may be search terms specified in a module by default. If these are not required, clear them.
Where you want to use a date range containing placeholders, enter the placeholder into the control:
 Placeholders in the TexQL statement
#TODAY#
This placeholder is replaced with the date on which the export is run. The date order used (e.g. day/month/year, month/day/year) is as specified for your EMu system.
#STARTDATE#
This placeholder is replaced with the date of the first day after the end date of the previous export. It is used for date range queries to specify the starting date for the exported records.
#ENDDATE#
This placeholder is replaced with the date of the last day for the records to be exported. The end date is always the day before the scheduled date as exports are run early in the morning of the scheduled day.
#MONTH#
This placeholder is replaced with the month of the day that falls immediately prior to the day of the export.
The month is a number between 1 and 12.
For example, if the export date is 3 May, #MONTH# is 5 (May); if the export date is 1 May, #MONTH# is 4 (April).
#YEAR#
This placeholder is replaced with the year of the day prior to the execution of the export.
Note: Placeholders use the day before the date on which the export is run as the closing date because exports are run early in the morning: the closing date for searches does not include the current date as the day is not yet complete.

- Select Search>Show on the Home tab of the Ribbon to display the Edit Search box:
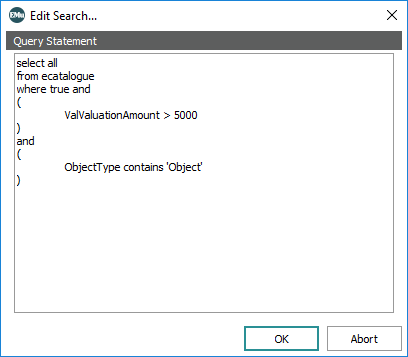
- Copy the contents of the Edit Search box (highlight the entire text and press CTRL+C).
- Click Abort to close the Edit Search box.
Paste the TexQL statement into the Conditions tab of the Export Properties box.
- In the module from which the records are to be exported, enter search terms as though you were retrieving the records you would like to export.
- In the Export Properties box, select the Sort Order tab.
All fields in the module are listed in the Fields list.
- Select a field in the Fields list and click Add to add it to the Order list.
-OR-
Double-click the field name in the Fields list:
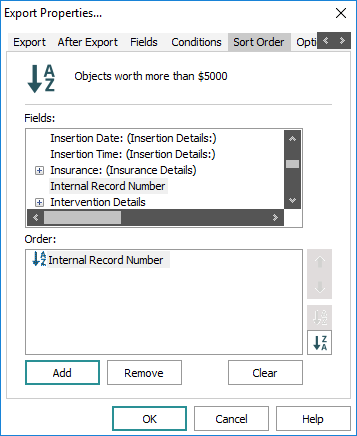
Add as many fields on which to sort as required.
Options
Description
Up
 and Down
  arrows
Use
 and
and  to the right of the Order list to prioritize the sort order of fields.
Records will be sorted by the first field in the Order list, and then by the second, and so on.
For example, if the first sort field is by year and the second sort field is by title, records will be sorted into years and then within each year, by title.
The arrows will be greyed out while there is no field or only one field added to the Order list.
Sort ascending
 and Sort descending
Records are sorted in ascending order (A to Z or 1 to 10) by default. To reverse the sort order of a field, select it and click
 .
.
To remove a field from the Order list, select it and click Remove.

Click to clear all fields from the Order list.
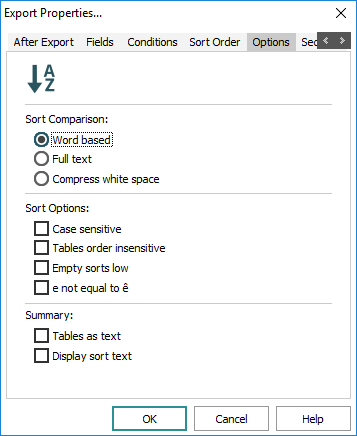
If required, select the Options tab to specify any sort options:
|
Sort Comparison |
Description |
|---|---|
|
Word based |
Sort disregards all punctuation and white spaces (more than the one space between words). For example: Traveler's Inn will be sorted as Travelers Inn |
|
Full text |
Sort includes all punctuation and white spaces. For example: Traveler's Inn will be sorted as Traveler's Inn |
|
Compress white space |
Sort includes punctuation but disregards all white space (with the exception of a single space between words). For example: Traveler's Inn will be sorted as Traveler's Inn |
|
Select one or more of these sort options by clicking in the corresponding checkbox: |
|
|
Case sensitive |
Sort is sensitive to upper and lower case. For example:
will be sorted separately to
|
|
Tables order insensitive |
Values in a multi-value field will be sorted alphabetically regardless of the order in which they display. For example, one record has the following values in the Roles field in this order:
Another record has the same values in the Roles field but in a different order:
If Tables order insensitive is selected (checked / ticked), the values in this field will be sorted in alphabetical order before the main sort, resulting in both records being displayed in the same sort order. |
|
Empty sorts low |
If this option is selected, all empty records will be placed at the start of the sort rather than at the end. |
|
e not equal to ê |
Values that include diacritics will be sorted separately to those that do not. For example, |
|
Summary |
|
|
Tables as text |
All values that display in a multi-value field will be considered one value in the Summary Results window. For example, three values - Collection Manager Curator Internet Administrator Thus the number of values in the Summary Results window will match the number of records. If this sort option is not selected, each value in a multi-value field will display as a separate value in the sorted display. One value will be |
|
Display sort text |
Displays the text in the Summary Results display in the format in which it will be sorted, e.g. punctuation included, white space disregarded, case sensitive, etc. |
On the Security tab we determine who is authorized to run your export by adding users or groups to the Access list:
- If required, select the Security tab to give other users permission to use this export.
- Click OK.
Any TexQL statement added on the Conditions tab is now validated and if all is well the new scheduled export will display in the Exports box.

